Tuesday, 8 April 2014

The year coming to an end.

The school year is coming to an end, and so is my obligation to write on this blog. I might continue posting on it from time to time, as I plan to keep studying after I finish this course.

It has been a great year and I have learned so much through it. I remember starting using Scratch, which was a great way of being introduced to games development, but unfortunately a very limited tool. 

1st Level of my Taco Vengeance Game
Scratch programming

More on HUDs

So I was meant to publish this post last Friday, but it was messy and I was busy over the weekend working.

Anyway, last Friday I did some more work on my HUDs, and I'm almost finishing them. I did the objective panel that appears showing the next objective. I was very easy to create it, create a square, cut one of corners, add a texture to the background, stroke and then the text. I will have more of these with different text, stating the different objectives, but the same layout.
Pop-up note showing next objective


Monday, 7 April 2014

Programming day.

Back to work on my level, I decided to do some more programming today, I set up the teleporter rooms, but haven't done any programming on them yet because I don't know how I am going to link them yet. I am thinking of asking the player questions which he'll answer by choosing one of the portals, and the wrong answer will lead him to a room with enemies.

One of the many portal rooms

Tuesday, 1 April 2014

UDK game update - Troubles continue

I am having a problem with my AI bots on the last floor. They spawn but don't move, they just stand still. I tried fixing that by adding a pylon, but it doesn't work because it can't find a ground position. I've been doing some testing with pylons and landscape, and found that if I have a pylon on a higher ground, one on lower ground, and connect their area with a staircase, the pylons will form a path on that staircase. 

Pylons creating path in staircase

Friday, 28 March 2014

Damage blood HUD.

Today I started creating my game HUDs, I started by creating the blood that shows up when the player is hit. I created two of these, one showing up when the player is hit but has high health and one for low health.

High health damage HUD

Adding enemy AI

The focus of today was adding enemy AI to the game. First I started by adding a bot on the first floor that greets you warmly with plasma shots. I've also added a little Matinee sequence in there to show the player where to find a weapon.

After that I started adding AI to the last floor. The AI in there is spawning randomly and will go after the player. It should be the most difficult fight for the player, as the fog will be limiting the vision and there will be lots of enemies.

I successfully created the code for spawning randomly, but had problems with the AI not moving around. I still haven't figured out how to fix this, at the moment I am trying to copy and paste this level in a new file. I think the problem is in the navmesh, and hopefully creating the level again should solve it.

Enemy AI spawning at random places

Tuesday, 25 March 2014

Creating custom HUDs.

A new Image Processing assignment has come up, this time I will be designing my own custom HUD's for my 3D game. For this I will be using Adobe Flash and import the .fla file to UDK. The first step is to install the ScaleForm extension, there is a very good tutorial to do that in YouTube. It uses an older version of Flash but it doesn't make a difference to me.


3D game update - Pick ups

Today I started adding health, weapon and armor pick ups to my level, they're very easy to place, just select them from the actor class and drag and drop them into your level. I am not sure yet how many and where should I put the pick ups, I'll have to test them a lot to find the right places and amounts.

One thing that I want to change in the pick ups though, is the respawn rate, the pick ups automatically reappear after some time, I want to remove that from some of them, but i'm not quite sure of how to do that yet.

Health pick-up

Thursday, 20 March 2014

3D Game update.

Today was a slow day, I spend most of it fixing the lighting on the 5th floor(sauna). The problem is that I had to keep rebuilding the game all the time, so it consumed a lot of my time. But I managed to get a nice result with a dim light and the fog.

I also created the teleporter in the basement. I'm only using it because I couldn't get a ladder working for some reason. The next step is going to be adding the teleporters in the teleporter room and then adding A.I.

Top teleporter

Bottom teleporter with trigger activating teleport code

Lights and fog on 5th floor


Tuesday, 18 March 2014

Back to level building

With my to do and wish lists done, it's easier to focus on what needs to be done. Today I was trying to figure out how to add a teleporter, turns out since i'm using a UDK game type, I can't add the teleporter present in the actor classes, since they only work in a UT game type.

But I also got some more done, I added the lighting to the 4th floor and a couple of soundtracks. The 4th floor is going to be the teleporter room, which is basically a puzzle, but I didn't want the player to just keep trying different teleporters until he got the right one, so I'm going to make a puzzle on that floor. Each room will have a question and the answers will be on top of the teleporters so he can choose the right ones to proceed.

Teleporter to basement

Work Experience

Fro the past couple of weeks I haven't posted anything to this blog since I was on work experience. I went to Plymouth through the Leonardo da Vinci Programme, and was placed in the Marketing Department of City College Plymouth.

While not being in my specific area, the work placement was a very unique and fantastic experience. I improved my communications skills, learned work ethics in a professional environment and also learned more about games programming.

 My main tasks there were to upload and tag pictures in the College's website. Since it wasn't a very interesting task, I came up with an idea of a game where the game would ask questions about the user and in the end suggest him suitable careers and courses.

Sample of the game I created

To do and wish list for my game

These two lists are things that need to be done so I get full marks, and what I ant to add to my game, red means no progress done and blue means that it's almost done.

·        Pre – Production:
o   Analyse Game structure and Produce Plans and logs for Edit
Status: Almost done – Game dev sheets
o   Utilise social Networking tools to document development of projects
Status: Done – Learner Record
o   Identify game progression challenges appropriate to the game.
Status:
o   Create game concept art
Status:  Done – Concept Board
o   Evidence of level mapping
Status: Almost done – sketch the remaining floors
·        Production:

o   Basic Level Structure
Status: Done
o   Correct use of static meshes
Status: Done
o   Physics and Particle systems
Status: Almost done – Improve placement
o   Create AI for enemies or friendlies
Status:
o   Realistic Lighting
Status: Almost done – check 4th and 5th floor
o   Sounds
Status:
o   Into/cut/end scene
Status: Almost Done – create end scene
·      Post- Production:
o  Game Q&A
Status:
o  Package
Status:
o   Game Design Report
Status:
Wish list:
  • ·        Add door puzzle linking to water volume
  • ·        Finish Teleport Room
  • ·        Place more static meshes

Friday, 28 February 2014

Textures Assignment / UDK Game Update

During this and last week I had time to finish my textures assignment, which asked me to create 5 textures for my game. I've uploaded screenshots of the final textures in the level.


Applied texture

Tuesday, 25 February 2014

Animations

Today I learned how to create a cinematic. Nothing fancy or difficult, I just created a camera animation, showing the player where he has to go after solving one of the puzzles in the level.

I followed the tutorial on World of Level Design, I recommend you guys check it out, it's very good.

I only used for a simple camera movement so far, but you can create a lot of cool stuff with it. I plan to add more on my level, for the intro and end scenes.

Camera actor used in animation

Monday, 24 February 2014

Troubles.

Last week I was on midterm break and didn't do much work. But the little I did brought me to a dead end. For some reason I can't build the lighting in my level and I don't know why. I've been trying to find out what is causing the problem without success, specially because it's taking more or less 10 minutes to build the lighting in the level.

I think it is one of the static meshes I have imported recently, but I can't find which one yet. Other than that I still have a few things to adjust and after that I will be mostly doing programming.

Ground floor

Tuesday, 11 February 2014

Lighting and some programming.

Today's focus was setting up emissive lights and start programming. Since building the level after I added a emissive light to see how it looked would take too long, I opened a new map created a room and added the static mesh with the emissive light to check which values would be good for my level. This way I could simply copy the values and build my level once. Here's how the basement looks like with only emissive lights.

Lighting in Basement

Friday, 7 February 2014

Decals in UDK.

Creating decals in UDK is easy as pie. I created this Blood Spatter decal in less than 5 minutes. First off, you need a cool texture. You can find it on the internet or create your own.

Image sample


Thursday, 6 February 2014

Fog and Wind

Fog and wind are added as class actors to your level. There are 5 types of fog and 2 types of wind. Let's start with the fog.
Fog diminishing visibility

Tuesday, 4 February 2014

3D Map Update

Ok, so I did some more work today on my map, I managed to add a nicely detailed basement, doors, pillars and my water lift. I have a lot of work to do with static meshes, but because I need to import a lot of them this is going to take some time. Here's what i got so far:

Ground floor

Basement

Friday, 31 January 2014

Texture Tiliing

New Friday, new assignment! This time we're learning how to create textures and materials to use in our game. I started by creating a tile-able texture, for this i'm following this handy tutorial:
http://onlinedesignteacher.blogspot.ie/2013/02/how-to-create-seamless-texture-tileable.html

I am currently in the process of cloning the textures and it is very time consuming. This is what I got so far:

Cloning stage


Tuesday, 28 January 2014

Importing Static Meshes in UDK

The level I am creating is going to be a hotel, and with the default UDK meshes it would be impossible to create a nice hotel, so I decided to import static meshes from the internet to use in my game.

Imported static mesh

Monday, 27 January 2014

3D Game update

I did some more detailing on my level today, adding detail and foliage. I was trying to fix the stairs, but unfortunately UDK crashed a few times on me, but i'll continue that tomorrow.

Skybox and foliage added

Friday, 24 January 2014

Final Concept Board

I made some more modifications to the final concept board stage and got much better results. The building blends in better, the bubbles colour is more lively and the text is easier to read.

Finished concept board

Tuesday, 21 January 2014

Depth of view and terrain changes

Doing some more work on my map today I realized the terrain didn't look good from the distance, the player could see some holes on the map  and the textures looked too patchy. So I changed the scale of the materials in the material editor and it looked much better. I also created more sections of terrain to make the environment look more realistic.

Adding detail to the landscape

Friday, 17 January 2014

Concept Board Update

I did some more work on my concept board today and the present stage is this:

Concept board for my UDK level

This is much better than the previous stage for it is more colorful, the sky background is better filled with the clouds and the beach also looks better.

3D mode in Photoshop

The newest version of Adobe Photoshop features a 3D mode for your shapes and text. In order to activate it you need to have your image mode set to RGB, then go to the 3D menu on top and select New Layer Extrusion.


3D image example

You can use this tool for 3D text also, this creates a cool effect for headings.

Example of 3D text

Wednesday, 15 January 2014

Starting the level.

First day on the production stage of the game. Today I laid out the terrain and added blocked the terrain.
Starting with the set up, using landscape mode I created 4 terrain blocks with 32x32 in size forming a square. Then created the lightmass and blocking volume each just a little bit bigger than the terrain.

Basic terrain

Adding Materials in Landscape Mode

The Landscape mode was discussed previously here, but in that post I didn't cover how to add materials to your landscape terrain. This is a little bit more difficult to do than in Terrain mode.

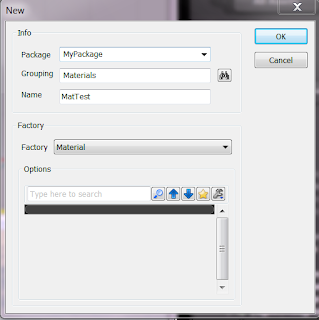
First you need to "create" the materials you are going to use. Go to the content browser, right click anywhere then select new material, this will prompt a new screen asking where you want to create the new material. You can create a new package to save it, the select a group. After you do that, make sure you right click on the recently created package and save it.

Creating new material

Tuesday, 14 January 2014

Concept Board for 3D Game

My next Image Processing Assignment requires me to create a concept board for my upcoming 3D game. I will use Photoshop to do so. Since it will be printed, the file will be created in CMYK and I set a few margins for the print limit.

 First stage is to block out more or less the placement of images and text as a whole image. Simply drawing blocks for each element.
Draft

Thursday, 9 January 2014

Landscape Editor

The Landscape Editor mode is very similar to the terrain mode, but it is better optimized, in the sense that it will use less memory, and it also works on mobile maps, where the terrain mode doesn't.

Landscape editor

Tuesday, 7 January 2014

Boolean Puzzles

Today I set up a small puzzle involving Boolean variables. It consists of rotating wheels in the right position. It is simple and silly, but it is the base for other puzzles.

The Setup:
Boolean puzzle

Door Keys

Creating keys is a good way to get the player to go to certain areas or accomplishing something within your level. Then the player use the keys to open a door and proceed to the next area.
To do that we need a mesh to act as a key and a door animation. In this example we'll use two keys:

Trigger activating key

Monday, 6 January 2014

Foliage

To quickly add small meshes, like grass, rocks or others, you can use the foliage editor, on the top left corner. It is similar to adding a texture on terrain mode. The downside to it is that it adds a lot of meshes, so it will consume a lot of memory, decreasing performance. Use it in small doses to enrich your level.

Added foliage