 |
| One of the many portal rooms |
Showing posts with label Programming. Show all posts
Showing posts with label Programming. Show all posts
Monday, 7 April 2014
Programming day.
Back to work on my level, I decided to do some more programming today, I set up the teleporter rooms, but haven't done any programming on them yet because I don't know how I am going to link them yet. I am thinking of asking the player questions which he'll answer by choosing one of the portals, and the wrong answer will lead him to a room with enemies.

Friday, 28 March 2014
Adding enemy AI
The focus of today was adding enemy AI to the game. First I started by adding a bot on the first floor that greets you warmly with plasma shots. I've also added a little Matinee sequence in there to show the player where to find a weapon.
After that I started adding AI to the last floor. The AI in there is spawning randomly and will go after the player. It should be the most difficult fight for the player, as the fog will be limiting the vision and there will be lots of enemies.
I successfully created the code for spawning randomly, but had problems with the AI not moving around. I still haven't figured out how to fix this, at the moment I am trying to copy and paste this level in a new file. I think the problem is in the navmesh, and hopefully creating the level again should solve it.
After that I started adding AI to the last floor. The AI in there is spawning randomly and will go after the player. It should be the most difficult fight for the player, as the fog will be limiting the vision and there will be lots of enemies.
I successfully created the code for spawning randomly, but had problems with the AI not moving around. I still haven't figured out how to fix this, at the moment I am trying to copy and paste this level in a new file. I think the problem is in the navmesh, and hopefully creating the level again should solve it.
 |
| Enemy AI spawning at random places |
Thursday, 20 March 2014
3D Game update.
Today was a slow day, I spend most of it fixing the lighting on the 5th floor(sauna). The problem is that I had to keep rebuilding the game all the time, so it consumed a lot of my time. But I managed to get a nice result with a dim light and the fog.
I also created the teleporter in the basement. I'm only using it because I couldn't get a ladder working for some reason. The next step is going to be adding the teleporters in the teleporter room and then adding A.I.
I also created the teleporter in the basement. I'm only using it because I couldn't get a ladder working for some reason. The next step is going to be adding the teleporters in the teleporter room and then adding A.I.
 |
| Top teleporter |
 |
| Bottom teleporter with trigger activating teleport code |
 |
| Lights and fog on 5th floor |
Tuesday, 18 March 2014
Back to level building
With my to do and wish lists done, it's easier to focus on what needs to be done. Today I was trying to figure out how to add a teleporter, turns out since i'm using a UDK game type, I can't add the teleporter present in the actor classes, since they only work in a UT game type.
But I also got some more done, I added the lighting to the 4th floor and a couple of soundtracks. The 4th floor is going to be the teleporter room, which is basically a puzzle, but I didn't want the player to just keep trying different teleporters until he got the right one, so I'm going to make a puzzle on that floor. Each room will have a question and the answers will be on top of the teleporters so he can choose the right ones to proceed.
But I also got some more done, I added the lighting to the 4th floor and a couple of soundtracks. The 4th floor is going to be the teleporter room, which is basically a puzzle, but I didn't want the player to just keep trying different teleporters until he got the right one, so I'm going to make a puzzle on that floor. Each room will have a question and the answers will be on top of the teleporters so he can choose the right ones to proceed.
 |
| Teleporter to basement |
Work Experience
Fro the past couple of weeks I haven't posted anything to this blog since I was on work experience. I went to Plymouth through the Leonardo da Vinci Programme, and was placed in the Marketing Department of City College Plymouth.
While not being in my specific area, the work placement was a very unique and fantastic experience. I improved my communications skills, learned work ethics in a professional environment and also learned more about games programming.
My main tasks there were to upload and tag pictures in the College's website. Since it wasn't a very interesting task, I came up with an idea of a game where the game would ask questions about the user and in the end suggest him suitable careers and courses.
While not being in my specific area, the work placement was a very unique and fantastic experience. I improved my communications skills, learned work ethics in a professional environment and also learned more about games programming.
My main tasks there were to upload and tag pictures in the College's website. Since it wasn't a very interesting task, I came up with an idea of a game where the game would ask questions about the user and in the end suggest him suitable careers and courses.
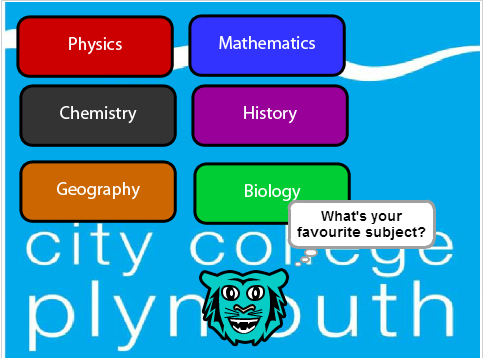 |
| Sample of the game I created |
Tuesday, 7 January 2014
Door Keys
Creating keys is a good way to get the player to go to certain areas or accomplishing something within your level. Then the player use the keys to open a door and proceed to the next area.
To do that we need a mesh to act as a key and a door animation. In this example we'll use two keys:
 |
| Trigger activating key |
Monday, 16 December 2013
Toggling view mode
To enable the player to change his view type during the game, all we need is get a key press:
 |
| Getting camera change input |
In the node's properties, you can set which key will perform the input by changing its Input Name. On the console command, I used the command 'behindview' to set the third person mode. Then just link a player object to both nodes and voila, when the player press the V key (my chosen input) the camera mode will be change in game.
Friday, 13 December 2013
Life Counter and 3rd Person Camera
To add a number of lives the player will have, all you need is to set an int counter with a decreasing value, then when the player dies X times you announce he ran out of lives and add a command to end the game, which I do not know yet. Don't forget to set the Max Trigger Count in the Player Spawned Node.
 |
| Life counter and 3rd person camera view |
The third person view is created by using a console command linked to the player. The command is "behind view".
Tuesday, 10 December 2013
Enemy Waves
The next bit of programming I learned in UDK was creating enemy waves. The final code looks something like this:
 |
| Enemy waves code |
Monday, 9 December 2013
Patrolling AI
Now that I can create an enemy bot, the next level of programming is making it patrol an area.
This is how the code looks like, now let's break it down:
 |
| AI bot moving around in a patrol |
This is how the code looks like, now let's break it down:
Thursday, 28 November 2013
Adding a bot AI.
These are the steps you need to follow to add an AI bot to you level
Right click in level where you want bot to spawn, Choose add actor - add PathNode.
Select the path node and enter Kismet.
Right Click anywhere- New Event - Level Loaded
Right Click anywhere again - new action – actor - actor factory
right click on spawn point (actor factory)
choose new object var using PathNode 0
connect Level Loaded to Spawn Actor
on the actor factory properties (blue arrow) – choose UTActorFactoryAI
Click on drop down arrow beside Factory
Tick Force Deathmatch AI
Set Controller Class - None
Set Pawn Class – UTPawn
Tick Give Default Inventory
click the little Green Cross on Inventory List and select any weapon from the dropdown menu
Then to have the bot re-spawn follow these steps:
Right click in level where you want bot to spawn, Choose add actor - add PathNode.
Select the path node and enter Kismet.
Right Click anywhere- New Event - Level Loaded
Right Click anywhere again - new action – actor - actor factory
right click on spawn point (actor factory)
choose new object var using PathNode 0
connect Level Loaded to Spawn Actor
on the actor factory properties (blue arrow) – choose UTActorFactoryAI
Click on drop down arrow beside Factory
Tick Force Deathmatch AI
Set Controller Class - None
Set Pawn Class – UTPawn
Tick Give Default Inventory
click the little Green Cross on Inventory List and select any weapon from the dropdown menu
The final code should look something like this:
 |
| Adding a bot |
Then to have the bot re-spawn follow these steps:
- Add an Attach to Event Node ( New Action -> Event -> Attach to Event)
- Then a Death Node (New Event -> Pawn -> Death)
- Right click on the Spawned thingy in Actor Factory and create a new object variable
 |
| Respawning bot |
One extra thing I added, was a delay before the bot re-spawns. To do that, simply right click on the black thingy on the Death Node and add delay.
You now have a fully shoot-able bot, have fun!
Tuesday, 26 November 2013
First code in UDK
I finally started writing code for UDK, the first few lines being a simple light switch.
 |
| Adding a trigger |
Tuesday, 22 October 2013
2D Game - Update#4
The game is almost finished, but very bugged now. I will have to do lots of tests to fix them all. The game report is also done. Main things to work on:
- Fix bugs
- Add level 3
- Add sounds
- Add score
- Switch stickmen costumes
Sunday, 13 October 2013
Map Scrolling
Side scrolling is essential for 2D games. Most of them rely on this feature to move the character across the level, and they do so in a very clever way. Instead of having one big screen, the level is divided in parts and they move along the screen, instead of the character.
Since we're using scratch, the screen resolution is 480x360 pixels, so we'll create our level with double the size of that(960x720) and then we will divide it in four parts.
Since we're using scratch, the screen resolution is 480x360 pixels, so we'll create our level with double the size of that(960x720) and then we will divide it in four parts.
Friday, 11 October 2013
2D game - Update#2
Today I created a little bit more of code to my game, working on the variable "Ammo", which basically displays how much ammo you have on your gun.
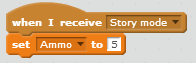 |
| This sets the ammo to 5 when the game starts. |
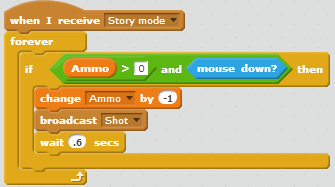 |
| The code for shooting. |
Saturday, 14 September 2013
Variables: Health, Timer and other uses
Variables are parameters you create that can represent various attributes such as time, health, number of users and basically anything you want. You can find the variable creation menu on the Data section of Scratch and to create one all you need is to click the button "Make a Variable". In the example below we created the variable "Health" to represent the total life our character will have in the game. All the commands related to variables are present in the menu as well.
Now deciphering the code; when the game starts we want the health to be set to 100, so the costume will be the full health costume. If the character is damaged by an enemy we need to change the costume according to how much health the character will have after being damaged and, since we made 10 different costumes for the health bar, we divided the current health of the character in multiples of 10, setting the costumes accordingly. This creates the effect that the health is decreasing as the character suffers damage.
But in order to damage our hero we need to create enemies and program them to do so. We chose two sprites that have 2 or more costumes to create an element of randomness as to when will the enemy attack, i.e. only one of the costumes will damage the character when in touch with it, the other will be the moment our here can escape.The first line of code tells the sprite to point towards our hero, basically just so the enemy can deal a frontal attack, instead of attacking with their backs turned to the character. The next line tells the sprite to change their costume after a random time, in our case, 1 or 2 seconds, but you may set it as you see fit. In the last line we set that when the the sprite is in the second costume and touching the character it will decrease the variable health by 10, meaning it caused damage to the hero.
 |
| Creating Variables |
Note: when creating this variable we set it for all sprites so we can specify how will the enemy will interact with the character and set how much life he will lose or gain.
Then we create a sprite with various costumes to represent our health bar. Notice on the left that each costume shows a small decrease in the amount of green and the same increase in red, representing life loss or gain.
 |
| Drawing the health bar |
Next we need to write the script of how will the health variable will work.
 |
| Changing health bar costumes |
Now deciphering the code; when the game starts we want the health to be set to 100, so the costume will be the full health costume. If the character is damaged by an enemy we need to change the costume according to how much health the character will have after being damaged and, since we made 10 different costumes for the health bar, we divided the current health of the character in multiples of 10, setting the costumes accordingly. This creates the effect that the health is decreasing as the character suffers damage.
But in order to damage our hero we need to create enemies and program them to do so. We chose two sprites that have 2 or more costumes to create an element of randomness as to when will the enemy attack, i.e. only one of the costumes will damage the character when in touch with it, the other will be the moment our here can escape.The first line of code tells the sprite to point towards our hero, basically just so the enemy can deal a frontal attack, instead of attacking with their backs turned to the character. The next line tells the sprite to change their costume after a random time, in our case, 1 or 2 seconds, but you may set it as you see fit. In the last line we set that when the the sprite is in the second costume and touching the character it will decrease the variable health by 10, meaning it caused damage to the hero.
 |
| Changing enemy costume |
And finally we need to give our hero a chance to survive, so we create a pickup that will restore health when touching the character. But we don't want it to restore health forever, so we add the "Hide, Wait 3 Seconds and Show" commands so the pickup will disappear for a few seconds before being reset. The "Set Size" command simply diminishes the size of the pickup to fit the screen in a better way.
 |
| Reducing health |
Below is the game:
Tuesday, 10 September 2013
First animation on Scratch and the Scratch Cards.
Using a very detailed step-by-step tool, I managed to create this little animation very easily:
 |
| Sample Scratch Card |
 |
| Rotation code |
Subscribe to:
Posts
(
Atom
)