 |
| UDK logo |
The first big difference to be noted is that UDK is a 3D engine, meaning that I will have to program for 3 dimensions instead of 2. Second; moving in a 3D space is a little bit more complicated than moving in a 2D space, so it takes some time to get used to move around the map. Here are some commands that will help you do that:
- Left mouse: movement forwards and backwards
- Right mouse: tilts the camera
- Left + Right: movement on the Z axis, up and down
- Mouse wheel: zoom in/out
- W,A,S,D: move around the map
 |
| Position |
 |
| Rotation |
 |
| Scale |
I also added wind and fog to my map. These are located in the actor classes menu and there are option which you can change their intensity, colour and many other options.
To learn the basics of UDK, I have watched the "Unreal in 1 hour" video on youtube. It was recorded from a presentation one of the developers gave and it gave me another depth of understanding on the engine. But it was also a bit overwhelming to realise how much there is still to learn and to master the use of the engine will take some time and a lot of dedication.
The first thing introduced in the video is a Binary Space Partition(BSP), this is a very technical term for a simple concept, which is dividing a 3D space into partitions with one dimension. This is how you see your level in the UDK editor, which each screen showing one of the three dimensions.
BSP/CSG
What is actually used in the making of a game are primitives(circles, squares, triangles, any 2 dimensional mathematical shape) to produce surfaces. This is called Constructive Solid Geometry(CSG) and it is used to block out levels and as a filler image on the background. They are in general slower to render than static meshes.
 |
| CSGs created with the Builder Brush |
With the CSGs you can add or subtract solid shapes to the world, like spheres, cubes, etc... Their creation is bound to the builder brush, which is basically a frame indicating the shape and position of the object. By clicking with the right button on the geometrical brush you can change the object's properties, like hollowness, size and many others.
You can also create new shapes for the builder brush by overlapping existing shapes with it and using the CSG intersect button. To manage your brushes easily, remember to use the brush view mode.
Static Meshes
These are models created on sculpting softwares, like Maya, 3DSMax and Blender, that are imported to UDK. They are very fast to render because no matter how many times you use them in your map, the video card will only load it into cache once and then position, rotate and scale it. They can't be animated, but you can use materials to create vertex animations on them. Always remember to load them mesh before adding them to the world to use them properly!
Decals
These are the fine detail added to the level. They add more depth to the environment and work with pretty much all surfaces in the world, like meshes and geometry. They are usually pretty fast to render, but they can increase pixel overdraw if you are not careful, decreasing performance.
 |
| Slime Decal |
Lighting and Shadow
You can add lights in 4 different ways with UDK:
- Directional Lights
 |
| Directional Light example |
- Point Lights
 |
| Point Light example |
- Spot Lights
 |
| Spot Light example |
- Sky Lights
The properties of each type of light can also be changes. So, you can change the colour of your directional light, or alter the cone in your spotlight, etc...
 |
| Light Properties and colour |
Lightmass is an operation performed that calculate all the lights present in the level and "bakes" it. You can change the quality of your lightmass, but better quality takes an awful lot of time to be loaded.
Particle Effects
These add dynamic detail to the map, things like smoke, leaves falling, birds... They can collide and interact with the world, but need to be properly set up for that.
Sound Effects
Again, add more detail to the environment giving more immersion to the player. In the editor, sound can be toggled on an off by clicking the real time sound button. Sounds are represented on the screen by a soundblaster icon.
The range of the sound is displayed by circles indicating maximum and minimum range. These settings can be changed in the properties menu of the sound
Volumes
These are invisible brushes that define an area for localised effects. To add a volume, adjust the builder's brush in the right size and position then click with the right button on the volume button below CSG and select which kind of volume you want.
Blocking Volumes add invisible walls to the level. It's often advisable to simplify level collision by using blocking volumes.
After watching the presentation, I put some of what I learned and built a small room with an entrance and added decals to the floor and walls.
 |
| First building |
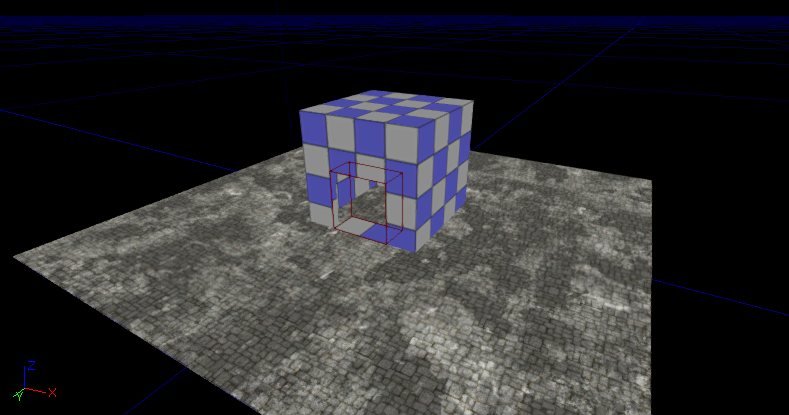
And after that, more learning! (lots of information today!!) This time I took a look at terrain. To start creating a new terrain, go to tools-> new terrain. You will see two sets of information: position, where on the space the new terrain is going to be located; and patches, these are the dimensions of your terrain, they are presented in U.U.(Unreal Units) and a 16x16 map is quite big already.
Next you click on the Terrain Editing mode and a new menu will pop up.
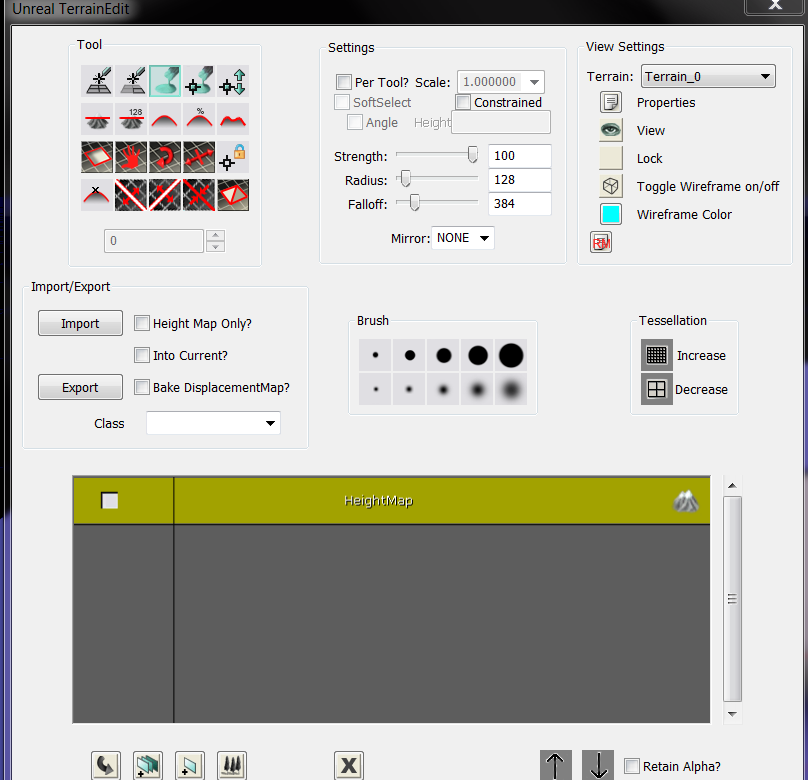 |
| Terrain editing options |
On the top left are the tools used to morph the terrain, they are elevations, depressions or smooth tools in general, and will create mountains, depressions or will smooth the surface according to its surroundings.
To add a texture to the terrain, you select the texture on the content browser, right click on the grey box beneath HeightMap and select New Terrain Setup Layer(auto-create) and it will apply to your terrain. You can have more than one texture to add detail, but having too many will cause performance issues.
 |
| Terrain with texture |
No comments :
Post a Comment